CNCers Keep Asking Me How I Made This On My CNC Router
I kept getting questions about how I made these retro 90s tech signs on my CNC router. The answer is a workflow that is much simpler than the finished pieces make it look. I found the designs online, turned each image into a Photo VCarve toolpath, carved it into inexpensive pine, added color, and sanded the surface to reveal the final image.
The best part is that this project uses one bit and one toolpath. Once you understand the recipe, you can use the same process for almost any photograph or raster image and create custom CNC wall art for a specific room, customer, hobby, or memory.
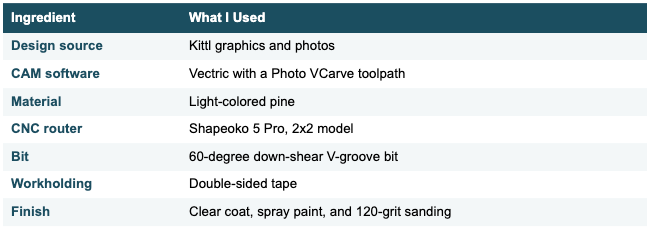
The Project Recipe
I like to think of a CNC project as a recipe. The machine, material, bit, toolpath, workholding, and finishing process all have to work together. Change one ingredient and the result can change quickly.
Step 1: Find a Design That Works for Photo VCarving
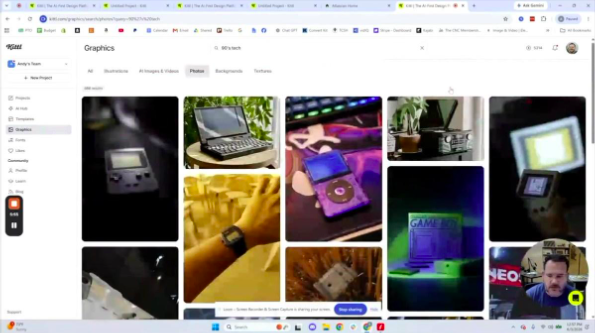
Searching Kittl for a usable 90s tech photograph. A clear image with recognizable shapes and contrast gives the Photo VCarve toolpath something to work with.
I started in Kittl and searched for 90s-inspired technology. Instead of trying to describe every detail to an AI image generator, I used the work already created by Kittl’s designers. That gave me thousands of graphics, illustrations, vectors, and photographs to explore.
For this workflow, I focused on photographs because I knew I would be using a Photo VCarve toolpath. I searched for specific pieces of technology, chose an image, placed it on an artboard, adjusted the crop and size, and exported it as a PNG.
That is what makes this process so useful. You can find an image that fits a specific client or situation, export it, and turn it into a custom wood carving without tracing every line by hand.
Step 2: Turn the Image Into a Photo VCarve Toolpath
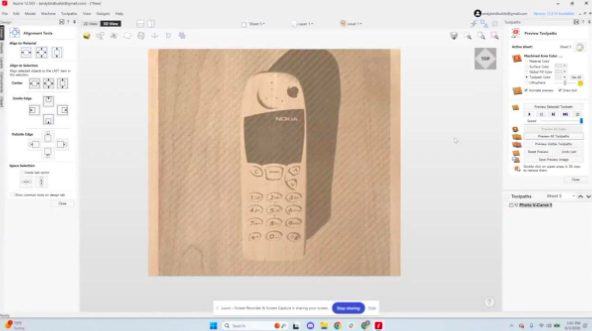
The Vectric preview shows how the single V-bit toolpath will reproduce the image with thousands of closely spaced carved lines.
After exporting the PNG, I imported the bitmap into Vectric and created a Photo VCarve toolpath. I used a 60-degree V-bit and parameters I had already tested for this project. Then I calculated the toolpath and used the preview to inspect the result before cutting any wood.
The software controls the depth of the V-bit across the image. Those changing depths create the lines and shading that make the final picture recognizable. In a matter of minutes, an image that was sitting on the internet was ready to be carved into wood.
Do not skip the preview. Zoom in, check the detail, and make sure the image reads correctly before sending the file to your CNC. The preview is where you can catch a bad crop, weak contrast, or a design that will not translate well.
Step 3: Make Pine Work for a Detailed V-Carve
I chose pine for this project, which may sound like a bad idea for detailed V-carving. Pine is known for fuzzies, soft fibers, and chip-out. It can be frustrating when you need crisp details.
I still wanted to use it for a few practical reasons. Pine is inexpensive, easy to find, and available in panels wide enough for this type of wall art. A light-colored material also gives you the contrast needed for the paint-and-sand finishing process. Since I planned to paint the project, I did not see a reason to use an expensive hardwood.
The first part of making pine work was sealing the board with clear polyurethane before carving. That clear coat helps prevent paint from soaking into the surface later, and it also gives the soft fibers something to absorb. The goal is to stabilize the surface enough to reduce chip-out and fuzzing during the carve.
Step 4: Use Workholding That Leaves the Entire Face Clear
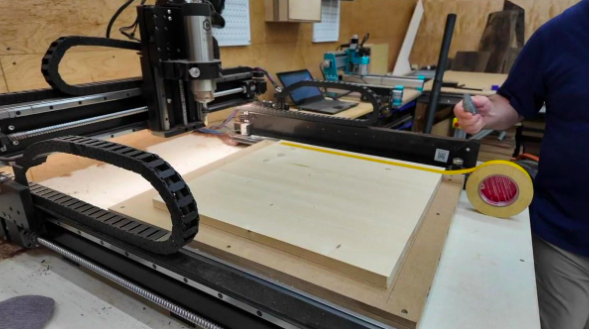
Double-sided tape keeps the face completely clear and works well for this shallow, low-force toolpath.
Because the toolpath covers the entire face of the board, clamps and screws were not good options. Clamps could interfere with the machine, and screws would leave holes in the finished face.
This is one of the situations where double-sided tape is a great choice. Photo VCarving is a shallow, low-impact toolpath, so it does not apply the same cutting forces as a deep pocket or aggressive profile cut. The tape holds the board securely while keeping the whole surface open for machining.
Step 5: Use the Right V-Bit for Pine
The bit is the secret to getting acceptable detail from pine. I used a 60-degree down-shear V-groove bit from Cadence Manufacturing, created by Cody from Jenny Bits.
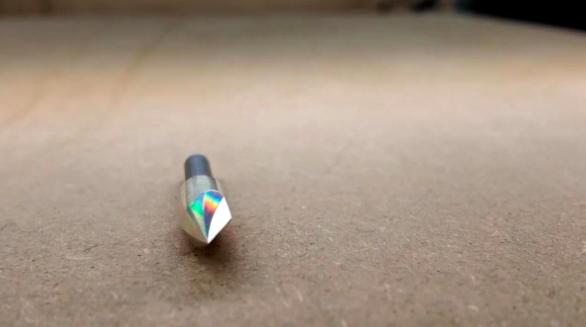
The down-shear geometry pushes fibers toward the surface and helps reduce chip-out and fuzzies in pine.
A typical V-bit has straight cutting edges. A down-shear V-bit adds a slight spiral cutting action that pushes the wood fibers downward as it cuts. That down-shear action helps reduce chip-out along the top edge and cuts down on the fuzzies that can ruin a detailed V-carve.
Will pine look as flawless as a tight-grained hardwood? Maybe not. But this project proves that you can get a very usable result when the bit, surface preparation, and toolpath are all working together.
Step 6: Carve the Image With One Toolpath
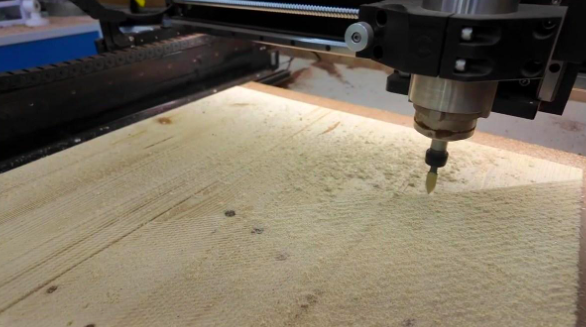
The single Photo VCarve toolpath builds the image through closely spaced lines and changing V-bit depths.
I carved these signs on a Shapeoko 5 Pro 2x2, but this project is not limited to that machine. Any CNC router with enough cutting area can make a Photo VCarve project. The bigger requirement is having software that can generate the toolpath correctly.
The toolpath is shallow, but it contains a lot of movement. The V-bit travels across the board and changes depth to build the image one line at a time. That is why secure workholding, a sharp bit, and a stable setup matter even though the cut is not aggressive.
Step 7: Clear Coat, Paint, and Sand for the Reveal
The finishing process is what brings the design to life. After carving, I cleaned the dust and fuzzies out of the grooves. Then I added another clear coat before applying spray paint.
That second clear coat made a major difference. My most reliable sequence was:
Clear coat the raw pine before carving.
Carve the Photo VCarve toolpath.
Clean the grooves and remove loose fibers.
Apply another clear coat and let it dry.
Spray paint the full surface.
Let the paint cure for about 24 hours before sanding.
The extra clear coat keeps the spray paint from soaking deeply into the face of the pine. It also makes the paint easier to remove during sanding while allowing the color to remain down inside the carved lines.
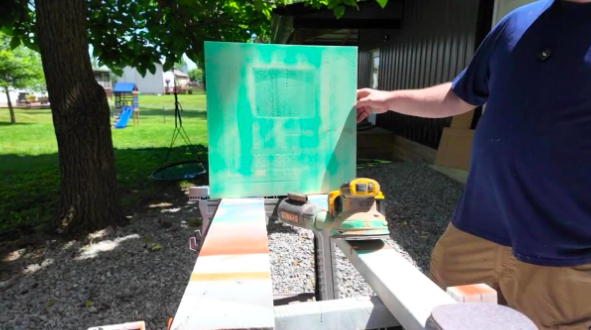
After clear coating and painting, the image is visible but the real transformation happens when the paint is sanded off the face.
Sand Outside and Protect Yourself
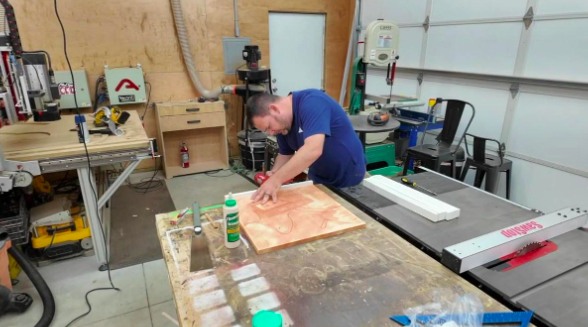
Using 120-grit paper, sand the face evenly until the natural wood returns and the paint remains in the carved image.
This step creates paint dust, and the sandpaper gums up quickly. I recommend doing it outside and wearing a mask. I went through several sheets of sandpaper while dialing in the process.
I used a random orbital sander with 120-grit paper and kept the sander flat and even. The goal is to remove the paint from the face of the board while leaving it inside the carved lines. Work slowly and clean the dust out of the grooves as you go so you can see your progress.
Some faint toolpath lines may remain in areas without strong image detail. I found that they actually helped the finished piece by adding subtle shading and texture.
Step 8: Frame the Signs and Put Them on the Wall
Once the paint was removed and the image was fully revealed, I added simple wood frames and hung the four signs together. The framed collection looks like a set of vintage prints, but each image is actually carved into the wood.
I am really happy with how these turned out. The combination of the line-based carving, faded color, pine grain, and subtle toolpath texture gives them the worn-in retro look I was trying to create.
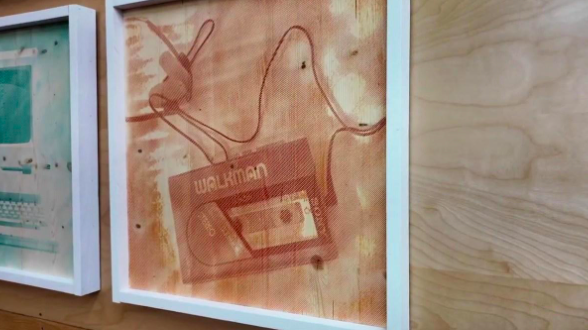
The final carving has the look of a vintage screen print, but the image is permanently cut into the wood.
Download the Free Vectric Files
I am sharing the exact Vectric files I used for these four retro 90s tech signs. These are the original Vectric project files only. I do not have additional file formats available for this project.
DOWNLOAD THE FREE VECTRIC FILES
You can also explore Kittl for thousands of graphics, photographs, vectors, and AI design tools that can be adapted for CNC projects.
This project is only the beginning. Find an image that means something to you, build the recipe around your material and machine, and go make something you are proud of.